The Dogwood Initiative: Protecting British Columbia’s Coastline

Although it’s been about 5 years since I left the non-profit world for a life of scuba diving, tourism, and boating, I’m still drawn to the work that’s being done by passionate and compassionate people around the world.  From harnessing the power of impoverished girls (The Mariposa Foundation) and empowering displaced Haitian migrant workers (Kiters4Communities) in the Dominican Republic to a worldwide charity and donor connecting service (ServicesInAction) based in Toronto, I always seek out opportunities to stay involved and witness the change we can make!  Here on the west coast, I have discovered The Dogwood Initiative.

I arrived in Victoria, BC on Vancouver Island in May of this year just for a nice visit with some friends who live here and what I discovered continues to impress me !  I encountered friendly, laidback people all who are deeply in love with the ocean that surrounds them, not to mention a welcoming and active scuba diving community.  These are all things one would expect from individuals living an island life!

After deciding to stay and getting a summer job at The Brentwood Bay Resort Marina and helping out with Rockfish Divers, I learned about a fascinating non-profit organization called The Dogwood Initiative.  Over the years, I have been witness to (and employed by) a wide variety of non-profits some of which have included, Habitat for Humanity, Multicultural Council, YMCA, Canadian Centre for Victims of Torture, Crosscultural Services, ACCES Employment, Council for the Access to Professional Engineering, and Kiteboarding 4 Girls.  These organizations are on meaningful and significant missions to help, protect, educate and to simply do more.  With objectives and deliverables being met to serve the greater good as a whole or just one person at a time, all of them are making a difference in this world through the lives they touch and to society as a whole.

The Dogwood Initiative - Protecting British Columbia's Coastline

www.DogwoodInitiative.org

However, The Dogwood Initiative stands out from the crowd for me.  They are driven to:

-Provide real remedies rather than band-aid solutions

-Work towards systemic change to broad issues through realistic and meaningful channels

-Use collaboration and inclusion among key players


Let me use information from their website to provide more details about their philosophy:

“Wherever you go in the world, private interests are taking over public resources, such as air, land and water. In British Columbia, Dogwood Initiative is pioneering a model to put control back in the hands of the public by bringing together citizens and First Nations to reclaim decision-making power over their natural resources”

“Right now, 96 per cent of British Columbia’s land is owned by the people, but 88 per cent of that land is controlled by large timber, mining and oil companies”

www.NoTankers.ca

The Dogwood Initiative has two important campaigns that they are focusing their energies on right now.  One in particular, The No Tankers campaign, will truly affect the underwater livelihood that is so majestic on this side of the planet

The No Tankers campaign is seeking to prevent the most powerful oil companies from pushing more crude oil tankers to BC’s coast.  More tankers would seriously jeopardize the livelihoods of tens of thousands of British Columbians as well as the stability of the Great Bear Rainforest and south Gulf Island ecosystems all in the name of profit.  The Dogwood Initiative seeks to collaborate with British Columbians and the First Nations here, the private sector, and the public sector to make decisions that are in the best interest of this province and land.  So far,

- 100+ First Nations have banned oil pipelines or tankers using their own laws.

-146 609 People support their campaign against the expansion of crude oil tanker traffic.

-410 Businesses have signed their petition against the expansion of crude oil tanker traffic.

And how about you?  Would you like to have your say?

On December 1st, 2013 Rockfish Divers hosted their 1 year anniversary of owning this lovely dive business on Vancouver Island.  Not only was it a super fun day of scuba diving with a marina clean-up, there was also an online auction with some pretty cool items to bid on with all proceeds going towards The Dogwood Initiative.

Take a look at the auction items here.

If you have any questions or want to get involved, just drop me a line!

Take a look at some of the photos from the event on the DiveWithMia Facebook page!


Part 5 – Your Lungs & Scuba Diving: Easy, Breezy, Breathing!

What’s the most important rule in diving?  Never hold your breath!  If you remember one thing from your dive course, that’s usually it; but do divers really know why it’s so important?

This is the final post in a series on air and its relationship to 5 key areas in diving that I’ve been writing about.  If you haven’t already done so, take a peek at the introduction for some important background notes to ensure you understand the basics about air and pressure.  These are directly related to what we’ll be talking about here and I encourage you to explore any of the other topics as well to expand your diving knowledge!

Understanding Air and its Relationship to 5 Key Areas in Scuba Diving

Part 1 – BCD Air Inflation/Deflation and Buoyancy: A Balancing Act!

Part 2 – Equalizing Your Ears: Let’s Get Popping!

Part 3 – Equalizing Your Mask: Don’t Squeeze Me!

Part 4 – From Tank to Breath of Fresh Air: The Journey!

What happens if I hold my breath while scuba diving?

Do you remember when I talked about how the air inside your BCD will expand as you swim up, even just a metre or a few feet?  And the need to let some air escape to maintain your position?

What would happen if you didn’t let that air escape?

Well, you would continue to float upwards and the air would continue to expand and cause you to float up faster and faster – a potentially very dangerous situation because divers need to ascend slowly from every dive (no faster than 18m or 60ft/minute).

Just like your BCD, your lungs have air inside and if you don’t let the air escape as you ascend (even just a metre or a few feet) you can do some serious, if not fatal damage to your lungs and body.  Considering that, let’s get back to that #1 rule in diving again – Never hold your breath and always keep breathing! If you do hold your breath and you ascend, the air in your lungs will expand and keep expanding until any of these life threatening possibilities might happen:

1. Lung over expansion injury where your lungs over stretch from the expanding air that is forced into the chest cavity, otherwise known as pneumothorax (collapsed lung).

2. Lung over expansion injury where your lungs over stretch from the expanding air that is forced into the space between the lungs and around the heart, otherwise known as mediastinal emphysema.

3. Lung over expansion injury where your lungs over stretch from the expanding air that is forced under the skin, otherwise known as subcutaneous emphysema.  I saw this once when a teen was goofing around on his safety stop and the surge brought him up while he held his breath.  The sound of his voice sounded strange and he told us what he had done.  We gave him oxygen and he stayed in the hospital for observation for a day or two, but was okay.

4. The most dangerous of all, Arterial Gas Embolism where the expanding air pushes its way through the tissues of the lungs and into the blood stream where it could cause a blockage to your brain or elsewhere.

To learn more about these and other news and research in diving, check out the DAN website and these articles I referred to when writing this:

Decompression Illness:  What is it and What is the Treatment

Mechanism of Injury for Pulmonary Over-Inflation Syndrome

So, if you are ever in an out of air situation and you need to get to the surface in order to breathe (and your buddy is nowhere to be found or also out of air), remember to swim no faster than 1ft/second and look up while making an “ahhh” or humming sound with the regulator still in your mouth.  The air that is in your lungs will expand as you go to the surface but will be able to escape as you swim up.

Breathing and Buoyancy

Ensuring that you are always breathing during scuba diving not only protects you from fatal injuries, it also allows you to enjoy a more comfortable dive.  Let me explain how your lungs and breathing contribute to buoyancy in scuba diving…

At first thought, it may be difficult to imagine your lungs like a big internal balloon that gets bigger as air goes in (inhale) and smaller as air goes out (exhale), most likely because we don’t actually think about the act of breathing as it happens.  However, the image of a balloon is a perfect example of what our lungs are like.  Just like a balloon, when it is inflated, the balloon floats and when it contains very little air, it sinks – just like our bodies in diving!

Maybe you’ll remember a time when you were VERY excited about a dive…or maybe even a bit nervous and no matter what you tried to do, you could not descend at the beginning of your dive.  You probably didn’t realize it, but you were most likely breathing very quickly with short breaths in and out.  This would have caused your lungs to stay very full of air – which would have made you float!  Remember – Breathe out! Your body won’t forget to breathe in, but by thinking about your exhales:

1. You will feel more relaxed and in control of your breathing as you deliberately push air out of your lungs after each breath in.  If you are excited/nervous, this is also the way to regain control of yourself and feel calm.

2. You will be able to descend more easily as you remove air from your lungs by consciously pushing a nice breath out as you go down and then continue to breathe naturally once you are underwater.

3. You will use less air by producing nice long exhales with every breath in and not have to end a dive early due to low air.

So, if you’d like to descend a metre or a few feet, a nice slow exhale out will cause your lungs to deflate and your body to drop down in the water.  This works the same if you would like to rise up a little – just take a deep breath in, exhale a little bit out, and then another big breath in, and you are likely to start to ascend.  In order for you to keep yourself from ascending more, breathe out completely and to maintain your position in the water (not go up, or down), a steady rhythm of inhale/exhale will keep the volume of air in your lungs consistent to keep you hovering in the same spot.  It is important to note here that while you may not be breathing in a regular rhythm while you are adjusting your position in the water, you must never hold your breath – even just for a few seconds – to maintain your position.  This is called “skip breathing” and can result in carbon dioxide levels which are not being expelled properly to become elevated in your body and may result in you passing out underwater.

Using your breathing as a tool to manage your buoyancy is a technique divers are always trying to perfect.  Practice every time you go out diving and don’t forget the number 1 rule in diving!

I’d love to hear from you – Please don’t hesitate to send me a message here, or on my Facebook page and let me know what you think or if you have any questions!

Safe and Happy Diving

DiveWithMia – PADI Scuba Diving Skills, Experience, and Passion for Life!

Part 4 – From Tank to Breath of Fresh Air: The Journey!

Air, air, everywhere!  I think it’s interesting to meet divers and non-divers of various levels and to listen to their interpretations of how scuba functions.  I can’t tell you how many people refer to breathing the air from their tank as “breathing oxygen”, which is incorrect.   In this section of the 5 part series on air and its relationship to diving, I’d like to offer a summary of what actually happens when you take a breath through a regulator underwater!  If you’d like some other insights into air and its relationship to diving, please check out the other parts of my series here:

Understanding Air and its Relationship to 5 Key Areas in Scuba Diving

Part 1 – BCD Air Inflation/Deflation and Buoyancy: A Balancing Act!

Part 2 – Equalizing Your Ears: Let’s Get Popping!

Part 3 – Equalizing Your Mask: Don’t Squeeze Me!

Part 5 – Your Lungs & Scuba Diving:  Easy Breezy Breathing!

Air and the Scuba Tank

Before I begin, here’s a little information about the air that is in your scuba tank.  First of all, the air that we breathe underwater, is the exact same as what we breathe on land (21% oxygen, 79% nitrogen); the only difference is that it is compressed to fit inside a tank.  You may have heard divers talking about the size of their tanks:  80 cubic feet/ 12L; 63 cubic feet/ 10L; 100 cubic feet/ 15L; but, what exactly are these numbers referring to?

In the metric world, divers refer to the size of their tank based on the internal volume, for example, as if it was filled with water.  When we talk about a 15L, 12L, or 10L tank, it is with reference to how much water it can hold.  In fact, it actually holds 2265L of compressed air to a working pressure of 3000psi/210bar.  Considering the average person is breathing about 12L per minute on the surface while at rest, it’s good to know that there is more than just 12L of air in your typical tank!

In the imperial world, divers also refer to the size of their tank based on the internal volume, although they make reference to the capacity it has to hold compressed air to a working pressure of 3000psi/210bar as opposed to how much water it can contain.  So, you may hear a person refer to a standard tank as an 80, which means it can hold 80 cubic feet of air (the equivalent to 2265L).
So now we know that the air inside a scuba tank is the same as the air that surrounds us only that it is compressed to fit into a small container.  Just like a little backpack of air!  We also know how much air a typical scuba tank is able to hold.  What’s next?

How does the compressed air in your tank become the air you breathe underwater?  As you may remember from your scuba diving training, your regulator system is made up of 2 stages:  The First Stage, which is the part you attach to your tank and the Second Stage, which is what you breathe from (otherwise known as the Regulator and Alternate).  If you remember from my previous blog on air, as you go underwater, the air becomes denser; however, the air that’s protected by the walls of your tank is not affected by the increasing pressure underwater.  It stays the same.

The First Stage

If there was no First Stage, the air that came out of your tank would come out with a big blast because the contents are compressed into a small space.  So, to control the amount of air released every time

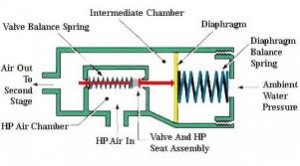
First Stage Balanced Diaphragm Diagram

First Stage Balanced Diaphragm Diagram

you take a breath, the regulator mechanism reduces the pressure in 2 stages.  Imagine your First Stage in 3 distinct, but interconnected parts.  All of the chambers are connected via a valve running from the first chamber through the second and attached to a rubber diaphragm, which separates the second from the third with a spring connected to the diaphragm in chamber 3.  Let’s look at each chamber individually:  We’ll call the first “The High Pressure Chamber” (Chamber 1).  This one is filled with high pressure air delivered directly from the tank when you turn it on.  It remains closed via the valve until you inhale.  The next chamber, which your regulator hose is attached to, will be called “The Intermediate Pressure Chamber” (Chamber 2).  This one is filled with intermediate pressure air as well as having a very cool relationship with the final chamber, which we’ll call “The Water Chamber” (Chamber 3).    Chamber 3 is filled with water, which mirrors whatever surrounding pressure you are at; whether you are at the surface, 30ft/9m down, or 100ft/30m down.  The surrounding pressure from Chamber 3 determines the intermediate pressure found in Chamber 2.  This is done via the rubber diaphragm.  So, those are your 3 compartments, now let’s see what happens when you inhale!  By taking a breath, we remove air from Chamber 2, thus reducing the intermediate pressure and causing the water in Chamber 3 to apply force onto Chamber 2 via the diaphragm.  But never fear!  This push opens the valve to Chamber 1, releasing a fresh batch of high pressure air and filling Chamber 2 until it is back to the surrounding pressure which pushes the diaphragm back to normal.

Woo Hoo!  Isn’t air and pressure cool?

The Regulator and Alternate

Alright, so we have got the high pressure air from your tank reduced to intermediate pressure in the First Stage, what happens once it gets to your regulator?  When the air arrives at your regulator, the pressure is reduced a second time (hence the name “second stage”) to the surrounding pressure.  The mechanism inside the regulator is actually quite simple.  Underneath the plastic cover you can find a rubber diaphragm which is attached to a little lever that acts like a valve to allow or stop air from the hose.  Underneath the plastic cover, you can find the exhaust where the bubbles go out when you exhale.  When you breathe in, the surrounding pressure is reduced inside the regulator, so the water pressure pushes in on the diaphragm, which releases the lever allowing air to flow in through the mouthpiece and into your lungs!  When you exhale, the surrounding pressure inside the regulator is increased, which pushes the diaphragm out and allows the lever to close the valve and opens the exhaust valve to allow the air to escape.  Pretty neat, eh?

Mia’s Recommendations

There are so many different brand names and a few different innovative features, but ultimately regulators and first stage systems are virtually the same.  If you plan to dive in cold water, you will want to ensure that the First Stage has some kind of environmental dry sealing feature to prevent the Chamber with water inside from freezing.

Some regulators will come with a “sensitivity” lever called a venturi switch which you can set to low (-) while on the surface to avoid free flows when the regulator is not in your mouth and resting on the surface of the water;  or set to high (+) while diving which is supposed to allow for ease of breathing.  In my experience, I always set this feature to low and divers who are relaxed underwater never experience difficulty breathing on that setting.  Sometimes I wish that setting didn’t even exist due to the amount or air lost through free-flows on the surface!  It’s not really needed, in my opinion.

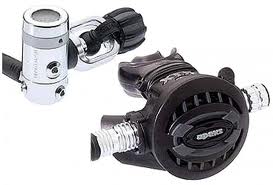
Apeks XTX50 First Stage and Regulator

Apeks XTX50 First Stage and Regulator

The First Stage I use is the first one I ever bought back in 2007 and is an Apeks, by Aqua Lung, which has a reputation for being a good quality cold water diving system while perfectly good in warm waters as well.   The regulator itself is a low end (and super!) XTX50, which has served me well for all the diving I’ve done over the last couple years.


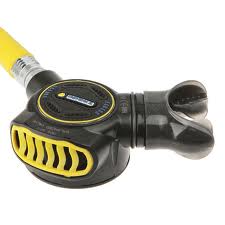
Apeks Egress Alternate Regulator

Apeks Egress Alternate Regulator

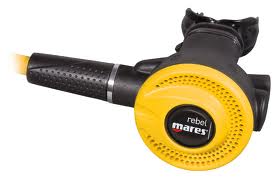
Mares Rebel Alternate

Mares Rebel Alternate

As for the Alternate, at the moment I am using a Mares Rebel, which replaced my Apeks Egress.  I decided to switch from the Egress to the Rebel mostly for teaching purposes.  The Egress can be used with the mouthpiece inverted or not, whereas, most regulators only function with the mouthpiece up (otherwise water enters in).  This is definitely a useful function for recreational divers; however, since I was teaching and wanted to represent the most common type of alternate, I decided to switch.

Definitely let me know if you have any questions or comments simply by sending me a message via my Contact Mia page.  Feel free to enjoy my other blogs on Understanding Air and Its Relationship to 5 Key Areas of Scuba Diving, Part 1 – BCD Air Inflation/Deflation and Buoyancy: A Balancing Act!, Part 2 – Equalizing Your Ears: Let’s Get Popping!, Part 3 – Equalizing Your Mask: Don’t Squeeze Me! And finally, Part 5 – Your Lungs & Scuba Diving:  Easy, Breezy, Breathing!

Happy Diving!

Part 3 – Equalizing Your Mask: Don’t Squeeze Me!

The third part in the scuba dive relationships with Air discusses the impact that air has on our masks at depth.  If you haven’t done so already, take a look at my briefing on how air is affected underwater to give you some background information first.

Have you ever wondered why scuba divers can’t use swimming goggles for diving?  Well, there is a very important reason that relates to air and pressure.  Your dive mask covers your eyes as well as your nose (unlike swim goggles) because just like the air space in your ears/sinuses, the air inside the mask becomes denser as you go underwater.  As the air becomes denser inside the mask, it pushes up against your face like a suction cup.  We need to achieve the same goal as with the ears and BCD – maintain a normal amount of air inside the airspace and we do this by pushing air into the space through our nose and into the mask and letting air escape as it expands.  This is called “equalize the mask”.

Mask Squeeze

Sometimes (not all times), if we forget to blow air out our nose and into the mask upon descent, we may end up with a “Mask Squeeze”.  This happens when the mask suctions onto your face so tightly that it bursts some blood vessels leaving a lovely bruise ring around your eyes, perhaps a black eye or two, or more commonly, bloodshot eyes!  This is very easily avoided by giving a puff or two out the nose as you go down.  Don’t worry about expanding air in your mask as you ascend because the air will naturally escape through the skirt of your mask .

Mia’s Helpful Tips!

  1. To select a properly fitting mask, place the mask on your face without putting the strap around your head.  Breathe slightly in through your nose.  If the mask does not fall off your face and you don’t hear or feel any air being sucked in around the skirt – You’ve got a good fit!
  2. If you tend to be a ‘nose-breather’, an exercise you can try in order to train yourself is to wear your mask while you are out of the water (around the house!).  Open your mouth to breathe in and then close it to exhale through your nose.  You will notice the mask popping off your face just a little and the air escaping easily just beneath the skirt of your mask.

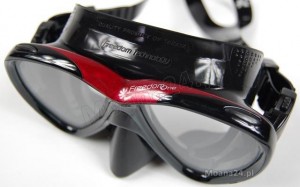
Tusa Freedom One Scuba Dive Mask

Mia’s Dive Mask Recommendation!

The mask I am using at the time I wrote this article is called the Freedom by Tusa.  It has an exceptionally soft skirt, a lovely field of vision, and if you have any interest in liberating yourself from unattractive goggle-y eyes – this mask definitely tops the sexy list!


Feel free to send me a message via Contact Mia if you have any questions regarding this topic and definitely check out the other articles in this 5 part series including Understanding Air, Your BCD, and Equalizing Your Ears and Sinuses, Your Tank and Regulator, and Your Lungs & Breathing.  If you “Like” it make sure you let me know on my Facebook page DiveWithMia!