Top 10 Reasons to Scuba Dive… After You’ve Been Dumped!!

DiveWithMia

DiveWithMia is in love with scuba diving!

In the tourism industry I have the awesome opportunity to meet and chat with people all the time.  A lot of these talks are the inspiration for my blogs and one topic that has been pretty interesting to me is the way romantic relationships play a role in scuba diving.  Sadly, I’ve heard many people take a long hiatus from diving due to a break-up, but in my opinion, I think scuba diving is the exact remedy a person’s heart needs in order to plow through a traumatic, dramatic, bummer of a break-up.  Here are the 10 reasons why…

  1. Exciting, Invigorating, Thrilling – Being in love is the best feeling in the world!  Your heart pounds as the object of your affection approaches, your stomach flutters with nerves as you make the call to ask him/her out, and even post visit/talk with your love you feel as high as a kite, which can last for days.  You know what else gives you these same feelings?  Scuba diving.  You may feel some nervous excitement pre-dive, your heart will pound full of life as you descend unknowing at what you will find, and your body will have the most natural high when all is done and you are out of the water packing gear away lasting until the next dive.
  2. Something To Do – Post break-up you may find yourself twiddling your thumbs (or hiding under the covers more like it) as all those lovey-dovey hours you used to spend with your girlfriend/boyfriend have suddenly come to a stop.  And what happens when you are by yourself with nothing to do?  You think about and make all kinds of illogical rationalizations about your ex.  Stop that!  Set a time and date to do a dive with someone or register yourself for a charter.  Sign up for something where someone’s dive depends on you to show up (i.e. they won’t have a buddy if you don’t come) and put an end to boring days with nothing to do!
  3. Diving is Zen – The stress and anxiety of a break-up can render you uptight and tense.  By getting underwater and breathing deeply like your scuba instructors around the world have told you to do, you will feel peace.  You’re probably all talked out after making an effort to make things work with your one love, so the best place to go is where there is no need to talk anymore…actually, you don’t even have to listen!  Just simply enjoy the feeling of being weightless and a part of another (better!) world and the imaginary chains hanging around your neck in the real world will disappear for those 45 or so minutes.
  4. New Social Scene – Is your ex-hunny at the dive shop you used to go to or involved with the dive club in town?  Showing up solo to a dive event is totally the way to go.  What other social scene refuses to hang lonesome ones up to dry, so to speak?  You’ll be assigned a buddy or grouped together with some potential new friends for life.  Scuba diving draws a variety of interesting characters together and usually divers are looking for someone to go out and get wet with.  And if the dry land conversation ends up kind of…dry, just get underwater!  In the wet world we all speak the same language, now don’t we?
  5. No Booze – Some people wallow their sorrows in alcohol consumption, which may cause them to forget the pain for a little while.  However, drinking post break-up undoubtedly leads to drunken phone calls and all sorts of other disastrous behaviour.  But, you’re in luck!  You can’t drink and dive and late nights prior to scuba diving don’t tend to work well with morning dives.  Stay sober, stay in and watch a chick flick (dudes and ladies alike), feel good and get up early the next day and DIVE!
  6. Exercise – It’s a well known fact that getting your heart rate up isn’t only good for determining your long life, it releases the same endorphins we feel when we are in love.  Underwater, scuba diving should be very relaxing with very minimal movement (which is why the sport is accessible to individuals of all fitness levels).  But on the surface, it’s like Cross-Fit training for Scuba Divers!  Things like carrying tanks and weights, walking to the dive site, getting in and out of the water and surface swimming and finning will get your heart pumping that vivacious red stuff through your veins releasing those yummy, exhilarating, well-being-inducing thing-a-ma-jiggers called endorphins.  Scuba diving is great exercise!
  7. Give ‘em a Break – The time you spend diving usually can take anywhere from half a day to a full day.  That gives your friends and family who have been listening to you lament with, what seems, no end in sight, a well-deserved break from you!  Let them refresh and rejuvenate themselves so they can continue being the amazing support and true friends they are.  They need to stay positive and encouraging while you are in the dumps, but they are only human.  Give ‘em a break and go diving today.
  8. Give Something Back – No, not the engagement ring.  I’m talking about volunteer work.  During your melancholic state, your normal level of self-awareness probably disappeared and allowed for a complete an utter immersion in self-absorption.  While your break-up experience is undeniably a trying time in your life, it’s important to note that there are bigger and more important things going on in the world!  For example, is anyone taking a knife to your fin right now and then throwing you back in the ocean to die like the innocent sharks suffering from shark finning?  I didn’t think so.  Scuba divers are the natural ambassadors to the sea and the majority of them realize the importance of the ocean and the need to protect it for our sustainable future.  Most dive shops have events that include underwater debris collection, reef and marine life observation and record-keeping, educational programs in local schools just to name a few.  Get involved with any of the amazing scuba diving related initiatives around the world and soon all that “woe is ME” stuff will be dust in the wind.
  9. Adventure – What’s more depressing than waking up, thinking about the ex, going to work, thinking about the ex, coming home, crying about the ex, making dinner, thinking about the ex, going to bed and doing it all again tomorrow?  Nothing!  That’s terrible!  While I’m a big believer in appreciating the now moments in life, the anticipation I feel about exciting plans for the future is something to live for.  Book a scuba diving trip in the near future.  Do it by yourself or with some diver friends (not your ex) and do anything from taking a road trip to a local dive site you haven’t been to yet, or enjoy a scuba dive liveaboard that takes you offshore to experience true ‘wilderness’ diving or maybe sip an ice cold beer post-dive on a lovely island beach in some exotic locale.  They are all do-able and they all allow you to focus on the awesomeness of the future.  The world is my (oops, I mean your) oyster as a friend told me the other day!
  10. Memories – Maybe the thought of diving is too much for you to bear because it was what you and your partner did together.  You learned together, you were amazing dive buddies, and now you can’t imagine ever doing a dive with anyone else.  Well, I say, don’t close the door on making new and improved memories!    Scuba diving offers way too much for you to decide to close the door on it forever.  Take your time if you have to and come back when you’re ready, but don’t limit yourself on how much scuba diving can enrich your life and the incredible paths it just might take you down.  Isn’t it time to just blow off some steam…er…bubbles, after all?  Let’s dive!


The Dogwood Initiative: Protecting British Columbia’s Coastline

Although it’s been about 5 years since I left the non-profit world for a life of scuba diving, tourism, and boating, I’m still drawn to the work that’s being done by passionate and compassionate people around the world.  From harnessing the power of impoverished girls (The Mariposa Foundation) and empowering displaced Haitian migrant workers (Kiters4Communities) in the Dominican Republic to a worldwide charity and donor connecting service (ServicesInAction) based in Toronto, I always seek out opportunities to stay involved and witness the change we can make!  Here on the west coast, I have discovered The Dogwood Initiative.

I arrived in Victoria, BC on Vancouver Island in May of this year just for a nice visit with some friends who live here and what I discovered continues to impress me !  I encountered friendly, laidback people all who are deeply in love with the ocean that surrounds them, not to mention a welcoming and active scuba diving community.  These are all things one would expect from individuals living an island life!

After deciding to stay and getting a summer job at The Brentwood Bay Resort Marina and helping out with Rockfish Divers, I learned about a fascinating non-profit organization called The Dogwood Initiative.  Over the years, I have been witness to (and employed by) a wide variety of non-profits some of which have included, Habitat for Humanity, Multicultural Council, YMCA, Canadian Centre for Victims of Torture, Crosscultural Services, ACCES Employment, Council for the Access to Professional Engineering, and Kiteboarding 4 Girls.  These organizations are on meaningful and significant missions to help, protect, educate and to simply do more.  With objectives and deliverables being met to serve the greater good as a whole or just one person at a time, all of them are making a difference in this world through the lives they touch and to society as a whole.

The Dogwood Initiative - Protecting British Columbia's Coastline

www.DogwoodInitiative.org

However, The Dogwood Initiative stands out from the crowd for me.  They are driven to:

-Provide real remedies rather than band-aid solutions

-Work towards systemic change to broad issues through realistic and meaningful channels

-Use collaboration and inclusion among key players


Let me use information from their website to provide more details about their philosophy:

“Wherever you go in the world, private interests are taking over public resources, such as air, land and water. In British Columbia, Dogwood Initiative is pioneering a model to put control back in the hands of the public by bringing together citizens and First Nations to reclaim decision-making power over their natural resources”

“Right now, 96 per cent of British Columbia’s land is owned by the people, but 88 per cent of that land is controlled by large timber, mining and oil companies”

www.NoTankers.ca

The Dogwood Initiative has two important campaigns that they are focusing their energies on right now.  One in particular, The No Tankers campaign, will truly affect the underwater livelihood that is so majestic on this side of the planet

The No Tankers campaign is seeking to prevent the most powerful oil companies from pushing more crude oil tankers to BC’s coast.  More tankers would seriously jeopardize the livelihoods of tens of thousands of British Columbians as well as the stability of the Great Bear Rainforest and south Gulf Island ecosystems all in the name of profit.  The Dogwood Initiative seeks to collaborate with British Columbians and the First Nations here, the private sector, and the public sector to make decisions that are in the best interest of this province and land.  So far,

- 100+ First Nations have banned oil pipelines or tankers using their own laws.

-146 609 People support their campaign against the expansion of crude oil tanker traffic.

-410 Businesses have signed their petition against the expansion of crude oil tanker traffic.

And how about you?  Would you like to have your say?

On December 1st, 2013 Rockfish Divers hosted their 1 year anniversary of owning this lovely dive business on Vancouver Island.  Not only was it a super fun day of scuba diving with a marina clean-up, there was also an online auction with some pretty cool items to bid on with all proceeds going towards The Dogwood Initiative.

Take a look at the auction items here.

If you have any questions or want to get involved, just drop me a line!

Take a look at some of the photos from the event on the DiveWithMia Facebook page!


Part 5 – Your Lungs & Scuba Diving: Easy, Breezy, Breathing!

What’s the most important rule in diving?  Never hold your breath!  If you remember one thing from your dive course, that’s usually it; but do divers really know why it’s so important?

This is the final post in a series on air and its relationship to 5 key areas in diving that I’ve been writing about.  If you haven’t already done so, take a peek at the introduction for some important background notes to ensure you understand the basics about air and pressure.  These are directly related to what we’ll be talking about here and I encourage you to explore any of the other topics as well to expand your diving knowledge!

Understanding Air and its Relationship to 5 Key Areas in Scuba Diving

Part 1 – BCD Air Inflation/Deflation and Buoyancy: A Balancing Act!

Part 2 – Equalizing Your Ears: Let’s Get Popping!

Part 3 – Equalizing Your Mask: Don’t Squeeze Me!

Part 4 – From Tank to Breath of Fresh Air: The Journey!

What happens if I hold my breath while scuba diving?

Do you remember when I talked about how the air inside your BCD will expand as you swim up, even just a metre or a few feet?  And the need to let some air escape to maintain your position?

What would happen if you didn’t let that air escape?

Well, you would continue to float upwards and the air would continue to expand and cause you to float up faster and faster – a potentially very dangerous situation because divers need to ascend slowly from every dive (no faster than 18m or 60ft/minute).

Just like your BCD, your lungs have air inside and if you don’t let the air escape as you ascend (even just a metre or a few feet) you can do some serious, if not fatal damage to your lungs and body.  Considering that, let’s get back to that #1 rule in diving again – Never hold your breath and always keep breathing! If you do hold your breath and you ascend, the air in your lungs will expand and keep expanding until any of these life threatening possibilities might happen:

1. Lung over expansion injury where your lungs over stretch from the expanding air that is forced into the chest cavity, otherwise known as pneumothorax (collapsed lung).

2. Lung over expansion injury where your lungs over stretch from the expanding air that is forced into the space between the lungs and around the heart, otherwise known as mediastinal emphysema.

3. Lung over expansion injury where your lungs over stretch from the expanding air that is forced under the skin, otherwise known as subcutaneous emphysema.  I saw this once when a teen was goofing around on his safety stop and the surge brought him up while he held his breath.  The sound of his voice sounded strange and he told us what he had done.  We gave him oxygen and he stayed in the hospital for observation for a day or two, but was okay.

4. The most dangerous of all, Arterial Gas Embolism where the expanding air pushes its way through the tissues of the lungs and into the blood stream where it could cause a blockage to your brain or elsewhere.

To learn more about these and other news and research in diving, check out the DAN website and these articles I referred to when writing this:

Decompression Illness:  What is it and What is the Treatment

Mechanism of Injury for Pulmonary Over-Inflation Syndrome

So, if you are ever in an out of air situation and you need to get to the surface in order to breathe (and your buddy is nowhere to be found or also out of air), remember to swim no faster than 1ft/second and look up while making an “ahhh” or humming sound with the regulator still in your mouth.  The air that is in your lungs will expand as you go to the surface but will be able to escape as you swim up.

Breathing and Buoyancy

Ensuring that you are always breathing during scuba diving not only protects you from fatal injuries, it also allows you to enjoy a more comfortable dive.  Let me explain how your lungs and breathing contribute to buoyancy in scuba diving…

At first thought, it may be difficult to imagine your lungs like a big internal balloon that gets bigger as air goes in (inhale) and smaller as air goes out (exhale), most likely because we don’t actually think about the act of breathing as it happens.  However, the image of a balloon is a perfect example of what our lungs are like.  Just like a balloon, when it is inflated, the balloon floats and when it contains very little air, it sinks – just like our bodies in diving!

Maybe you’ll remember a time when you were VERY excited about a dive…or maybe even a bit nervous and no matter what you tried to do, you could not descend at the beginning of your dive.  You probably didn’t realize it, but you were most likely breathing very quickly with short breaths in and out.  This would have caused your lungs to stay very full of air – which would have made you float!  Remember – Breathe out! Your body won’t forget to breathe in, but by thinking about your exhales:

1. You will feel more relaxed and in control of your breathing as you deliberately push air out of your lungs after each breath in.  If you are excited/nervous, this is also the way to regain control of yourself and feel calm.

2. You will be able to descend more easily as you remove air from your lungs by consciously pushing a nice breath out as you go down and then continue to breathe naturally once you are underwater.

3. You will use less air by producing nice long exhales with every breath in and not have to end a dive early due to low air.

So, if you’d like to descend a metre or a few feet, a nice slow exhale out will cause your lungs to deflate and your body to drop down in the water.  This works the same if you would like to rise up a little – just take a deep breath in, exhale a little bit out, and then another big breath in, and you are likely to start to ascend.  In order for you to keep yourself from ascending more, breathe out completely and to maintain your position in the water (not go up, or down), a steady rhythm of inhale/exhale will keep the volume of air in your lungs consistent to keep you hovering in the same spot.  It is important to note here that while you may not be breathing in a regular rhythm while you are adjusting your position in the water, you must never hold your breath – even just for a few seconds – to maintain your position.  This is called “skip breathing” and can result in carbon dioxide levels which are not being expelled properly to become elevated in your body and may result in you passing out underwater.

Using your breathing as a tool to manage your buoyancy is a technique divers are always trying to perfect.  Practice every time you go out diving and don’t forget the number 1 rule in diving!

I’d love to hear from you – Please don’t hesitate to send me a message here, or on my Facebook page and let me know what you think or if you have any questions!

Safe and Happy Diving

DiveWithMia – PADI Scuba Diving Skills, Experience, and Passion for Life!

Part 4 – From Tank to Breath of Fresh Air: The Journey!

Air, air, everywhere!  I think it’s interesting to meet divers and non-divers of various levels and to listen to their interpretations of how scuba functions.  I can’t tell you how many people refer to breathing the air from their tank as “breathing oxygen”, which is incorrect.   In this section of the 5 part series on air and its relationship to diving, I’d like to offer a summary of what actually happens when you take a breath through a regulator underwater!  If you’d like some other insights into air and its relationship to diving, please check out the other parts of my series here:

Understanding Air and its Relationship to 5 Key Areas in Scuba Diving

Part 1 – BCD Air Inflation/Deflation and Buoyancy: A Balancing Act!

Part 2 – Equalizing Your Ears: Let’s Get Popping!

Part 3 – Equalizing Your Mask: Don’t Squeeze Me!

Part 5 – Your Lungs & Scuba Diving:  Easy Breezy Breathing!

Air and the Scuba Tank

Before I begin, here’s a little information about the air that is in your scuba tank.  First of all, the air that we breathe underwater, is the exact same as what we breathe on land (21% oxygen, 79% nitrogen); the only difference is that it is compressed to fit inside a tank.  You may have heard divers talking about the size of their tanks:  80 cubic feet/ 12L; 63 cubic feet/ 10L; 100 cubic feet/ 15L; but, what exactly are these numbers referring to?

In the metric world, divers refer to the size of their tank based on the internal volume, for example, as if it was filled with water.  When we talk about a 15L, 12L, or 10L tank, it is with reference to how much water it can hold.  In fact, it actually holds 2265L of compressed air to a working pressure of 3000psi/210bar.  Considering the average person is breathing about 12L per minute on the surface while at rest, it’s good to know that there is more than just 12L of air in your typical tank!

In the imperial world, divers also refer to the size of their tank based on the internal volume, although they make reference to the capacity it has to hold compressed air to a working pressure of 3000psi/210bar as opposed to how much water it can contain.  So, you may hear a person refer to a standard tank as an 80, which means it can hold 80 cubic feet of air (the equivalent to 2265L).
So now we know that the air inside a scuba tank is the same as the air that surrounds us only that it is compressed to fit into a small container.  Just like a little backpack of air!  We also know how much air a typical scuba tank is able to hold.  What’s next?

How does the compressed air in your tank become the air you breathe underwater?  As you may remember from your scuba diving training, your regulator system is made up of 2 stages:  The First Stage, which is the part you attach to your tank and the Second Stage, which is what you breathe from (otherwise known as the Regulator and Alternate).  If you remember from my previous blog on air, as you go underwater, the air becomes denser; however, the air that’s protected by the walls of your tank is not affected by the increasing pressure underwater.  It stays the same.

The First Stage

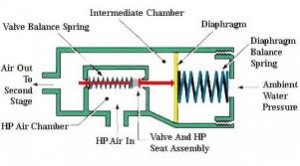
If there was no First Stage, the air that came out of your tank would come out with a big blast because the contents are compressed into a small space.  So, to control the amount of air released every time

First Stage Balanced Diaphragm Diagram

First Stage Balanced Diaphragm Diagram

you take a breath, the regulator mechanism reduces the pressure in 2 stages.  Imagine your First Stage in 3 distinct, but interconnected parts.  All of the chambers are connected via a valve running from the first chamber through the second and attached to a rubber diaphragm, which separates the second from the third with a spring connected to the diaphragm in chamber 3.  Let’s look at each chamber individually:  We’ll call the first “The High Pressure Chamber” (Chamber 1).  This one is filled with high pressure air delivered directly from the tank when you turn it on.  It remains closed via the valve until you inhale.  The next chamber, which your regulator hose is attached to, will be called “The Intermediate Pressure Chamber” (Chamber 2).  This one is filled with intermediate pressure air as well as having a very cool relationship with the final chamber, which we’ll call “The Water Chamber” (Chamber 3).    Chamber 3 is filled with water, which mirrors whatever surrounding pressure you are at; whether you are at the surface, 30ft/9m down, or 100ft/30m down.  The surrounding pressure from Chamber 3 determines the intermediate pressure found in Chamber 2.  This is done via the rubber diaphragm.  So, those are your 3 compartments, now let’s see what happens when you inhale!  By taking a breath, we remove air from Chamber 2, thus reducing the intermediate pressure and causing the water in Chamber 3 to apply force onto Chamber 2 via the diaphragm.  But never fear!  This push opens the valve to Chamber 1, releasing a fresh batch of high pressure air and filling Chamber 2 until it is back to the surrounding pressure which pushes the diaphragm back to normal.

Woo Hoo!  Isn’t air and pressure cool?

The Regulator and Alternate

Alright, so we have got the high pressure air from your tank reduced to intermediate pressure in the First Stage, what happens once it gets to your regulator?  When the air arrives at your regulator, the pressure is reduced a second time (hence the name “second stage”) to the surrounding pressure.  The mechanism inside the regulator is actually quite simple.  Underneath the plastic cover you can find a rubber diaphragm which is attached to a little lever that acts like a valve to allow or stop air from the hose.  Underneath the plastic cover, you can find the exhaust where the bubbles go out when you exhale.  When you breathe in, the surrounding pressure is reduced inside the regulator, so the water pressure pushes in on the diaphragm, which releases the lever allowing air to flow in through the mouthpiece and into your lungs!  When you exhale, the surrounding pressure inside the regulator is increased, which pushes the diaphragm out and allows the lever to close the valve and opens the exhaust valve to allow the air to escape.  Pretty neat, eh?

Mia’s Recommendations

There are so many different brand names and a few different innovative features, but ultimately regulators and first stage systems are virtually the same.  If you plan to dive in cold water, you will want to ensure that the First Stage has some kind of environmental dry sealing feature to prevent the Chamber with water inside from freezing.

Some regulators will come with a “sensitivity” lever called a venturi switch which you can set to low (-) while on the surface to avoid free flows when the regulator is not in your mouth and resting on the surface of the water;  or set to high (+) while diving which is supposed to allow for ease of breathing.  In my experience, I always set this feature to low and divers who are relaxed underwater never experience difficulty breathing on that setting.  Sometimes I wish that setting didn’t even exist due to the amount or air lost through free-flows on the surface!  It’s not really needed, in my opinion.

Apeks XTX50 First Stage and Regulator

Apeks XTX50 First Stage and Regulator

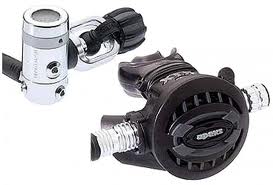
The First Stage I use is the first one I ever bought back in 2007 and is an Apeks, by Aqua Lung, which has a reputation for being a good quality cold water diving system while perfectly good in warm waters as well.   The regulator itself is a low end (and super!) XTX50, which has served me well for all the diving I’ve done over the last couple years.


Apeks Egress Alternate Regulator

Apeks Egress Alternate Regulator

Mares Rebel Alternate

Mares Rebel Alternate

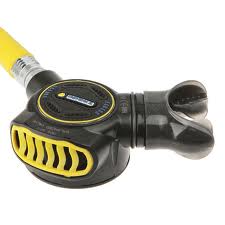
As for the Alternate, at the moment I am using a Mares Rebel, which replaced my Apeks Egress.  I decided to switch from the Egress to the Rebel mostly for teaching purposes.  The Egress can be used with the mouthpiece inverted or not, whereas, most regulators only function with the mouthpiece up (otherwise water enters in).  This is definitely a useful function for recreational divers; however, since I was teaching and wanted to represent the most common type of alternate, I decided to switch.

Definitely let me know if you have any questions or comments simply by sending me a message via my Contact Mia page.  Feel free to enjoy my other blogs on Understanding Air and Its Relationship to 5 Key Areas of Scuba Diving, Part 1 – BCD Air Inflation/Deflation and Buoyancy: A Balancing Act!, Part 2 – Equalizing Your Ears: Let’s Get Popping!, Part 3 – Equalizing Your Mask: Don’t Squeeze Me! And finally, Part 5 – Your Lungs & Scuba Diving:  Easy, Breezy, Breathing!

Happy Diving!

Part 3 – Equalizing Your Mask: Don’t Squeeze Me!

The third part in the scuba dive relationships with Air discusses the impact that air has on our masks at depth.  If you haven’t done so already, take a look at my briefing on how air is affected underwater to give you some background information first.

Have you ever wondered why scuba divers can’t use swimming goggles for diving?  Well, there is a very important reason that relates to air and pressure.  Your dive mask covers your eyes as well as your nose (unlike swim goggles) because just like the air space in your ears/sinuses, the air inside the mask becomes denser as you go underwater.  As the air becomes denser inside the mask, it pushes up against your face like a suction cup.  We need to achieve the same goal as with the ears and BCD – maintain a normal amount of air inside the airspace and we do this by pushing air into the space through our nose and into the mask and letting air escape as it expands.  This is called “equalize the mask”.

Mask Squeeze

Sometimes (not all times), if we forget to blow air out our nose and into the mask upon descent, we may end up with a “Mask Squeeze”.  This happens when the mask suctions onto your face so tightly that it bursts some blood vessels leaving a lovely bruise ring around your eyes, perhaps a black eye or two, or more commonly, bloodshot eyes!  This is very easily avoided by giving a puff or two out the nose as you go down.  Don’t worry about expanding air in your mask as you ascend because the air will naturally escape through the skirt of your mask .

Mia’s Helpful Tips!

  1. To select a properly fitting mask, place the mask on your face without putting the strap around your head.  Breathe slightly in through your nose.  If the mask does not fall off your face and you don’t hear or feel any air being sucked in around the skirt – You’ve got a good fit!
  2. If you tend to be a ‘nose-breather’, an exercise you can try in order to train yourself is to wear your mask while you are out of the water (around the house!).  Open your mouth to breathe in and then close it to exhale through your nose.  You will notice the mask popping off your face just a little and the air escaping easily just beneath the skirt of your mask.

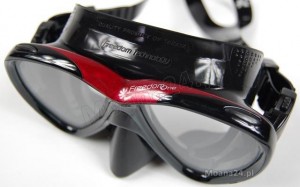
Tusa Freedom One Scuba Dive Mask

Mia’s Dive Mask Recommendation!

The mask I am using at the time I wrote this article is called the Freedom by Tusa.  It has an exceptionally soft skirt, a lovely field of vision, and if you have any interest in liberating yourself from unattractive goggle-y eyes – this mask definitely tops the sexy list!


Feel free to send me a message via Contact Mia if you have any questions regarding this topic and definitely check out the other articles in this 5 part series including Understanding Air, Your BCD, and Equalizing Your Ears and Sinuses, Your Tank and Regulator, and Your Lungs & Breathing.  If you “Like” it make sure you let me know on my Facebook page DiveWithMia!


Water Slide Review at the Atlantis Resort in the Bahamas!

The Atlantis Resort, Paradise Island, the Bahamas

In September 2012, I spent 3 days at the famous Paradise Island, Atlantis Resort in the Bahamas.  This is a unique hotel resort experience because it consists not only of the lavishness commonly found in this type of setting with stunning rooms, amenities, beaches, restaurants, and views; however, the Atlantis Resort stands out among its peers due to the fact that it also includes an extensive aquatic theme park which is included within the price of the stay of the hotel.  20 million gallons of water, 141 acres, 11 pools, 8 waterslides and 2 river tubing rides alongside aquarium glass tunnels, open lagoons filled with animals, and floor to ceiling windows featuring Reef Sharks, Manta Rays, Nassau Groupers, Jelly Fish, Lobster, and one of the most famous Bahamian animals the Conch!

From all of the countless features of this resort, I decided to focus on the Aquaventures water park.   And being the funny girl I am – strangely attracted to the thrilling, but ultimately satisfied with easy-going rides, here are my personal insights into each waterslide!

There are 2 areas in the Aquaventure water park with each section being home to 4 different waterslides.  To access the waterslides, you will need to find a Towel Hut and swipe your room key, so they can give you a bracelet.  My best advice, with regards to any pre-waterslide preparation, is to leave all money, watches, jewellery and anything of value in your room, otherwise you will have no choice but to leave it on a poolside lounger or rent a locker for a minimum of 7USD/day while you romp and play in the water.

Cool tunnel at the end of The Serpent waterslide

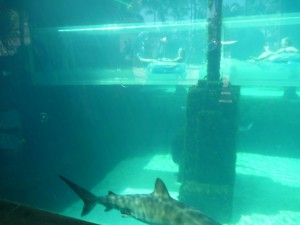
The first water playground we encountered was at The Mayan Temple.  There you will find 4 fun waterslides, one of which (and my personal favourite), requires a tube that you get prior to climbing the stairs to the top.  The Serpent takes you through an enclosed chute, first into darkness, then from side to side and finally down through a transparent tube.  The coolest part is that it runs straight through a huge aquarium full of sharks you can see from the safety of the ride and then tosses you out on the other side!  Fun!


The other 2 slides at the top of The Mayan Temple are for true thrill seekers.  You can choose between the super speedy 60 foot drop at a virtual 90 degree angle down on The Leap of Faith or The Challenger, which you and your friend can race down side by side to see who goes the fastest or the farthest with a heart-stirring bounce part way through!  Both are open air slides.

The other slide on The Mayan Temple is called The Jungle and I would call a more traditional style of slide.  It is open air and swishes you from side to side through mountainous terrain and drops you into a lovely pool of water.  This would be the tamer of the four slides, but still ignites a squeal of laughter or two along the way!

The Current river tubing ride

After The Mayan Temple why not make your way over towards The Power Tower, which is home to a great mile long tube ride called The Current.  The highlight of this river ride would definitely be the waves that rush you along as well as the route towards the end (stay to the left!) called “The Rapids”, which tumble and spin you every which way.  If you veer to the right instead, you will get the opportunity to do one of 2 super fun water slides with your tube, either The Drop or The Falls.  You will be directed onto a big elevator that will click clack your way to the top.  I tried The Drop and enjoyed the thrilling plummet and butterflies as I was sloshed about the tunnel!

The most exciting, thrilling, and scary waterslide, in my opinion, is atop The Power Tower and called The Abyss!  Even just climbing to the top is worth the 360 degree view of the ocean and resort, but don’t be surprised (or deterred!) if you hear both men and women scream as they drop down the dark tunnel.  Because the drop straight down at top speed with rushing water beneath you couldn’t be intense enough, why not ensure you are surrounded by pitch blackness!   Eeeek!  However, my favourite part of The Abyss is the ending (oddly enough) when it spits you out into a cave with 2 beautiful aquariums built into the walls – very cool!  Now, for a different kind of thrill, take a tube all the way back to the top of The Power Tower and enjoy a wild outdoor drop down The Surge and then twisty-swirly fun through rapids along the way!  Make sure you do what they tell you and don’t drag your bum and watch your toes as your tube gets bounced around!

The Dig

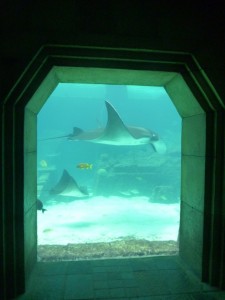
If waterslides are not your calling, I would like to highly recommend a fascinating presentation of the mythical civilization called Atlantis that, according to Plato, was destroyed by earthquakes and a tidal wave and rests below the surface of the ocean some 11 000 years ago!  Leisurely stroll through The Dig and enjoy this stunning aquarium; view the giant Manta Rays gracefully “fly” by or admire the striking Spotted Eagle Rays with their unique expressions and impressive formations.  You will also never forget the extraordinary Green Morays mouthing underwater words to you, the scrawling Lobster tank, and magnificent swimming Sea Horses and more!

All in all, I had a great time exploring even just a fraction of what Atlantis has to offer.  The only thing I found challenging was affordable eating and drinking options since the resort is not, in fact, a traditional all-inclusive.  You can make use of the convenience store across the street to purchase things like water, snacks, and alcoholic beverages to help with this.

I thoroughly enjoyed the Atlantis Aquaventure water park and all of its amazing animal creatures.  This is well worth a fun-filled day pass and a cool add-on feature at a luxury resort!

In front of the Beach Towers and Green Turtle pond

Part 2 – Equalizing Your Ears: Let’s Get Popping!

In my introductory post, I explained, in basic terms, what happens to Air when you go beneath the surface of water and in Part 1 I talked about buoyancy and the relationship between Air and the BCD.  In this post, I will describe the part that Air plays on our Ears and Sinuses and how we adjust our bodies to that with some super tips to help you in one of the most common challenges as new divers!

Even if you don’t know anything about scuba diving, there is a general understanding that something happens to our ears when you dive down deep and similarly when we’re on an airplane.  Many people even feel afraid to give scuba diving a try because of some discomfort they felt while free-diving.  Sometimes they think that the discomfort will be worse while scuba diving because typically it’s deeper than free-diving, but this is not necessarily true!

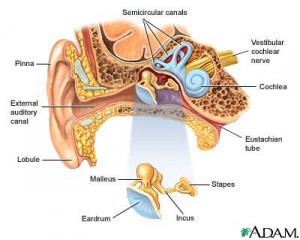
Ear Diagram

Ear Diagram

Let me first explain a little about our Ears and Sinuses… There are tubes leading from our ears and sinuses to our throats and they are filled with air.  As soon as you go underwater, our bodies feel the pressure and the weight of the water on these spaces as the air inside them becomes “smaller” (read my intro for more info on why air becomes “smaller” underwater).  The tubes are squeezed together by the pressure and the result is discomfort.  Our goal is to maintain a normal amount of air inside this airspace and push open the tubes, so we “equalize” it to the surrounding (“ambient” pressure for each depth).  We do this as soon as we go underwater and every 1m/3ft before any discomfort is felt.

It’s so easy to prevent any discomfort simply by pushing air into those spaces as you go down and we do that in 3 common ways:
1. Take a breath in through your mouth, plug your nose with your mouth now closed, and then try to breathe out your nose (while it is plugged).  This will push the air from your lungs into the ear tubes and sinuses instead of out your mouth/nose where they normally go.  Your Ear and Sinus air spaces open up!
2. Swallow and wiggle your jaw.  You can tilt your head from side to side and try to stretch your neck to try to help your body in letting the air get inside those tubes and air spaces.
3.  Do #1 while doing #2!

It’s also important to note that, as we talked about in the previous posts, not only does air change when you go down↓, but it will change when you go up↑.  You will remember that, as you swim up, you must manually release air from your BCD to adjust for the expanding air; however, with our Ears and Sinuses, we are lucky in that our bodies will release the expanding air naturally for us.  There is nothing you need to do with your Ears and Sinuses upon ascent.

So, just before I go into my tips, I want to point out a main difference I’ve noticed between free-diving and scuba diving with regards to equalizing your ears.  Many people (including myself) feel discomfort while free-diving because the descent tends to be very rapid – you’re holding your breath after all!  Whereas, with scuba diving a typical descent is slow and controlled, so you have the time to “clear” even the most sensitive of ears before ever feeling any discomfort.  Just like anything else with diving, it does take practice, so make sure you take your time!

Mia’s Helpful Tips!
1.    Prevention. Remember – equalizing is a preventative measure.  It’s a common misconception that you should wait until you feel discomfort and then try to equalize.  Don’t Wait!!
2.    Having Difficulty. Don’t push too hard!  The tissues inside your ears and sinuses are very delicate.  If you are having difficulty equalizing, ascend up 1m/3ft where the pressure is less and try again.
3.    Cold and Allergies. If you have a cold or allergies, the tubes and sinus air spaces will be swollen and filled with mucous (fluids).  You won’t be able to push air into these areas sufficiently OR the air that does get in may not be able to get out upon ascent.  As you swim up, it will expand inside the tubes and sinuses resulting in much pain called a Reverse Block and possibly permanently damaging these delicate tissues.  Try snorkeling on days that you have a cold/allergies!  Sometimes the salt water is just as good as a nasal spray with saline solution to get those boogies out!
4.    Changing depth. Remember – equalizing is not limited to your first descent along a line.  As you follow a sloping bottom, don’t forget to continue to equalize.  You will always need to adjust the amount of air inside those spaces depending on whichever depth you go to.
5.    Ear Plugs. If your ears are prone to infection, you may be using ear plugs.  My preferred ones are Doc’s Pro Plugs.  Make sure you purchase the ones with a pin hole so air is able to escape upon your ascent!
6.      Cleaning. I usually use a half and half mixture of alcohol and vinegar after I’ve been in the water.  The alcohol dries out all those little crevices in your ear that are prone to infection and the vinegar gives it all a good clean (and you get to smell like fish and chips – Yum!)

As you may be aware, I began this 5 part series with a goal of addressing some common queries I get from various dive students as well as certified divers.  While everyone receives the same training from PADI around the world, a lot of the practical tidbits of useful information are shared pre and post-dive on the boat or over a beer at the end of the day.  I know for me when I first started out diving, I only had the chance to dive maybe twice a year if I was lucky, so my learning curve was slow.  I’m hoping that these blogs will be able to provide some additional insights my divers can refer back to.  I hope you enjoy and feel free to let me know what you think via my DiveWithMia Facebook page or click on Contact Mia!

DiveWithMia – PADI Scuba Dive Skills, Experience, and Passion for Life!

Part 1 – BCD Air Inflation/Deflation and Buoyancy: A Balancing Act!

If you haven’t already done so, take a look at my introduction to Understanding Air and its Relationship to 5 Key Areas to Scuba Diving prior to reading this post to give yourself some quick and helpful background information!  In this post I will discuss the BCD, its correlation with air, some helpful tips, and then my personal equipment recommendation.  If you enjoy this article – let me know and stay tuned for the next 4 posts on how Air relates to Ears, Mask, Tank & Octopus, and your Lungs & Breathing!

The first specific area I’d like to talk about is the BCD or Buoyancy Control Device.  Divers wear this piece of equipment, which contains a bladder to hold air, like a jacket or vest.   Your BCD is connected to the air in your tank via the “Low Pressure Inflator Hose”.  It is also equipped to be “orally inflated” should there be a problem with the mechanism to add air from the tank.  You do this by blowing into the hose while holding down the deflate button (which opens the valve to allow air in/out).

Before you jump in the water you always make sure your BCD is partially inflated so that you can float on the surface.  When you are ready to go underwater you raise the Low Pressure Inflator Hose high above your head and release all the air from the BCD and exhale slowly, which also releases air from your lungs to assist in your descent.  As you come close to the bottom or the depth that you want to stay at, you will usually need to add some air into the BCD to prevent you from continuing down or hitting the bottom.

This tends to take a few dives as you learn the balancing act of how much air will maintain your general position at a certain depth.  Remember, the air that is put into your BCD is also affected by the pressure and becomes increasingly more (and less!!) dense depending on your depth.  That means that the amount of air you need to maintain neutral (neither sinking nor floating) buoyancy at 10m/32ft will be different than what you put in at 23m/75ft, for example.  This also means that when you change your depth by swimming over a reef or to a shallower depth, you must make adjustments to the amount of air inside the BCD by releasing air – even if you didn’t add any more air to it!!

This happens because just as going deeper causes the air to be more dense, ascending (even just a metre or 3 feet) will cause the air to expand and make your BCD fuller causing you to float upwards  until you release the air, which results in a balance of just enough air inside the BCD to achieve neutral buoyancy at that specific depth.  This is a kind of balancing act that at first takes some thought and will later become second nature to you.  Remember this important point – Upon ascent, consider that the air already inside your BCD will expand, so pay attention to your positioning and if you begin to float upwards.  Be prepared to release the air to balance it out and to avoid an uncontrolled ascent.

Mia’s helpful tips!
1.    Before diving and during your pre-dive equipment check, with the air turned on, practice putting air into the BCD and taking it out (inflate and deflate).  Sometimes it can be confusing when using rental gear on which button is which.  You can also practice orally inflating.
2.    While underwater, if you are trying to locate your Low Pressure Inflator Hose to inflate/deflate, always remember:  “If I touch my LEFT BOOB, I will find it!!!”  Anyone want to admit to trying to deflate their snorkel at some point of their diving career!!!???
3.    Having trouble deflating?  Air will always stay at the highest point as it rises.  If you are in a horizontal position, slightly head-first, that means the air could be sitting in the bottom part of your BCD as your bum will be higher than your shoulders.  Try to make it easy for the air to escape from your Inflator Hose by:
a.    Always raise the hose as high above your head as possible.
b.    Sometimes you can even adjust your positioning in the water from horizontal to momentarily vertical to further assist the escape of air from the Inflator hose as you reach up.

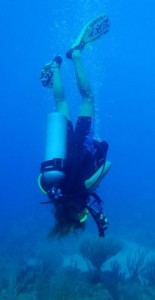
Mia Diving Upside Down

In a head-first position, use a dump valve to release air

c.    If for some reason you are head-first and your fins are high above you, this means any air in your BCD will actually be in the bottom of your jacket.  Most BCDs come with a “Dump valve” to release air from a head-first position underwater.  Feel around the bottom edge of your BCD for the cord and a little tug should allow a burst of air to escape.
4.    Little by Little!  Try to avoid the up and down ping-pong effect by thoughtfully inflating/deflating only a little, waiting for a result and then repeating as necessary.  As a beginner diver learning this fancy balancing act called buoyancy, stay calm if you feel yourself floating up upon ascent.  Remember to exhale completely as you release just a puff of air.  Many divers have felt a quick twinge of panic at floating up and proceed to do a big dump of air causing them to drop back down, but too quickly and beyond their intended neutral zone into a “negative buoyancy” (sinking).  This results in more fiddling of inflating again to achieve the comfortable hovering position.
5.    Make a commitment to get to know yourself!  Adding air to your BCD is not something you should typically be doing throughout the entire dive.  Remember that your buoyancy is not only controlled by your BCD, but ALSO by your breathing.  Make a commitment that on each dive once you achieve neutral buoyancy (neither sinking, nor floating) at a depth you will stay at for awhile, practice using your breathing to adjust your position in the water.  Refer to the post on your Lungs & Breathing blog to come in a few weeks!  Buoyancy is something that you will practice over and over again and WILL get!  Have patience, get familiar with your BCD and enjoy!

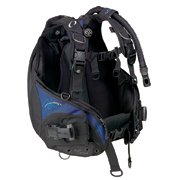
Mia BCD Oceanic Hera

Mia's favourite BCD - the Oceanic Hera

Mia’s BCD Recommendation!

The BCD I use now and absolutely love is called the “Hera” by Oceanic and created specifically for women.  It is both a jacket style and rear inflation form, which I love because I am stable in both horizontal and vertical positioning without back weights (although pockets for back weights are available if I want).  It also has a ton of sturdy D rings to attach my Alternate Air Source and attach my Surface Marker Buoy alongside big pockets to store a slate or some yucky plastic bottle I find underwater and want to put in the trash.  Before the “Hera” I used the Seaquest “Diva” for many years and loved, but I decided against the newer version of this due to my desire to leave rear-inflation styled BCDs and the lack of pockets and D-rings.  Sorry Diva you were good, but time to move on!

Feel free to send me a message via Contact Mia if you have any questions regarding this topic.  If you “Like” it make sure you let me know on my Facebook page DiveWithMia!

Happy Diving!

DiveWithMia.com


Understanding Air and its Relationship to 5 key areas in Scuba Diving

Air was a topic that I had wanted to write about for some time now as it seemed to be the common theme when discussing buoyancy, equalization, air consumption, safety and more; but, as I started writing I kept branching out on the topic and ended up with a super long blog!  Soon I realized and quickly decided that my topic had evolved into a 5 part series!  So, I am excited to present this blog as the introduction piece to this series and the topic that I am going to zero in on is all about Air and the impact that the underwater world has on that; Afterwards, I will go into more detail on 5 more specific areas of diving that all have important relationships with Air:  the BCD, our Ears, our Mask, the Tank & Octopus, and finally our Lungs & Breathing.


Some of the ins and outs of diving and air include a wee bit of background knowledge of a basic scientific principle.  Considering science and math have never held my interest for too long, I remember over 10 years ago when I did my Open Water training, I really brushed over these topics with a passing score yet not fully understanding the key concepts.  Now that I am an Instructor I see students struggling in the same way I did and I hope that I can offer some advice I wish an Instructor could have provided me earlier on!
So here goes for my little scientific introduction to air and diving…
As we all know, water has weight (when you pick up a bucket of water – it’s heavy!).  That means, when you go underwater there is a lot of weight on you; this is otherwise known as “Pressure”.  We are lucky though because the weight of water doesn’t have any effect on similarly composed liquids like the makeup of our body, so we can swim freely below the surface without feeling the weight of water on our bodies.  However, this weight does affect “Air Spaces”.  Air is made up of many molecules that are spread out all around us on the surface.  Underwater, air can be found inside our Buoyancy Control Devices (BCD), in our ear and sinus spaces, inside the mask, and in our lungs (of course!).  As you go underwater, the air molecules will get closer and closer together in each of these areas (air becomes “Dense”).
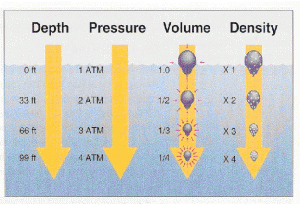
If you look at the Density arrow in the picture below, you will see that on the surface, Air Density = 1x and at 30m/99ft, Air Density = 4x.  That means, for example, that if you compare a breath you take on the surface to a breath you take at 30m/99ft, you would, in fact, be taking in 4x the amount of air you would breathe on the surface.  In addition, consider that as you ascend from your dive, that air becomes less dense and will naturally expand in the air spaces found in your BCD, ears/sinuses, mask, and even your lungs if you hold your breath!  It is quite a simple principle that is very helpful (and extremely important!) for you to practice fun, enjoyable and safe diving experiences.

Click here to read my next blog which will be about how Air and your BCD interact, including tips and equipment recommendations from DiveWithMia!

air-under-pressure

This is a good picture of what happens to air as you scuba dive underwater.

Results from the Sosua Bay Lionfish Hunt, March 4, 2012

What an incredible day for diving as the sun shone all day, the ocean remained calm and visibility reached 100ft!

With a total of 3 teams competing (Diwa – Rayo; Superior; Northern Coast), a total of 3300RD (84USD) was raised and distributed between the 2 teams who caught the MOST Lionfish and the BIGGEST Lionfish, a grand total of 100 Lionfish were caught and the biggest being 16 inches (412mm).  Everyone enjoyed a friendly competition and a delicious Lionfish dinner courtesy of Carlos at Coco’s bar in Sosua Bay parking area  (Sosua Bay Lionfish Hunt Poster).

MOST Lionfish caught:
Superior Dive – Wendy, Paul, Alberto, and Mia
75 Lionfish caught (Paul catching the most at one time – 18 on a two tank dive)
Biggest – 16 inches (406mm)
Dive Sites – Between Charamicos beach – Pyramids – 5 Rocks and Coral Garden wall

BIGGEST Lionfish caught:
Northern Coast – Jan, Keith, Claude, Jukka
22 Lionfish caught
Biggest – 16.25 inches (412mm)
Dive Sites – Pyramids – Farthest end of Airport Wall (where biggest was found and caught by Keith)

Special mention to:
Team Rayo (Diwa) – ChiChi and Jorge
3 Lionfish caught
BEST Team spirit!!!!

The raffle prize winners included:
500RD @ Jolly Rogers – Domingo
100RD @ Donovan’s – Chuck and Jan
Northern Coast caps – Carlos and Wendy
Northern Coast t-shirts – Amelio, Francisco (Chinwin), Keith, and Geoff
Superior Dive t-shirts – Robinson, Arturo, and Tomas
THANK-YOU SO MUCH TO our Sponsors!!!

I want to say a very special thank-you to everyone who contributed and participated including our beloved capitans – Domingo, Amelio, and Tomas and for ALL the help in filleting all 100 Lionfish (25lbs of meat!) by Paul, Caquito, and Arturo!  We couldn’t have done it without you!

A very inspiring day, indeed, as we worked together to address the problem of the over-populating Lionfish in this region.  Click here for more information and research regarding the problem.

We look forward to our next collaboration and contribution, which will be an underwater beach clean-up!

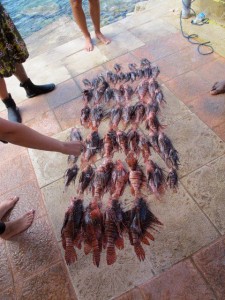
first-scoring-sosua-bay-lionfish-hunt-dominican republic

First Scoring of the Sosua Bay Lionfish Hunt - 52 Lionfish!